
The Application And while applying Klasse isn't rocket science, it does take some effort, time, and patience in order to achieve the best shine possible. On a unclean car I would give my self probably a good 3-5 hours. In reward, the shine (with regular washing will last up to 9 months or more. With Klasse, the ends do justify the means, so lets get started. The each kit contains both the AIO and the SG in 2 oz bottles. And while that may seem like a small amount, the typical Klasse application is about 1 coat per ounce. You will easily be able to get a 2+2 coating in with this kit providing for months of acrylic Klasse protection and shine. Someone who is used to the product may get double the coats you might, the first time. On my car, I got a coat of SG in about 1/2 an ounce (this is beacause of paint prep, the smoother your original finish, partly due to the AIO and other paint prep, the thinner you can spread the SG) You might want to take before pictures of your car before continuing. Step 1 - Prepare Your Car Thoroughly wash your car. Try to get off as much visible dirt contaminants as possible. As part of the paint preparation you may want to use products such as tar removers, clay bars, and swirl removers, etc. Your car should look as good (clean) as it can without wax on it before you start. For for further info check here too. Wash the wheels as well especially if you choose to Klasse your wheels (works great on painted wheels). Dry the car. (After step 1 your car should be "squeaky clean" and dry.) Step 2 Apply the AIO - Take your microfiber towel applicator and rip off the label (the towel is strong so don't be afraid to use some force)Go to the sink and rinse off the towel with water, wringing it a few times. Wring off the towel to get most of the water out. - Shake the bottle well and put a dime amount on the towel applicator (folded as to avoid rubbing the paint with the sewn edge or just concentrating strictly on the center of the cloth). You may just want to put the towel on the bottle opening and turn it over a few times. - Work the AIO into the paint with side by side slightly overlapping sweeps (usually In the direction of how air would flow if your car were being driven) Work 1 panel at a time using a fair to light amount of pressure and concentrating on problem areas like spots or tar. Here's my favorite panel order: hood, trunk, roof, front, upper side, back, upper other side, lower side, other lower side. Important: Remember this is not like a wax; it takes an extremely small amount of the stuff to get good results. You are not looking to get a thick haze or a waxy surface like you would from a product at the autostore. If the towel gets visibly dirty quickly, rinse and wring it in the sink again (you may want to rinse and wring the applicator after every panel. Work around the car doing the all the panels. Note: You have about 1 ounce for the whole car. As you get halfway though the car you should be only through ¼ of the bottle. Many of us use 1 or 2 oz bottles to help us gage the amount we are supposed to use, so don't feel you are skimping. - Clean your towel again and repeat around the whole car (this may use up the rest of the bottle) any extra amount will be used for windows or wheels if you like. (Rinsing the applicator again as you go and working on long slightly overlapping motions, etc) Concentrate on smoothing out the "rough" spots and visible contaminents (it might be a good idea to see if you are rubbing too hard as different clearcoats have different hardnesses. Also: After you are finished add a little water to your towel and clean all the windows (using the AIO residue on the towel or adding a little more). -Take a soft plush towel (preferably a microfiber from YoSteve.Com), and wipe off the residue left by the AIO. At this point the paint should be smooth as butter, without visible residue (if you really need to sprinkle some water on your towel before buffing in order to remove any slight haze) So okay that was a long step 2 but you're almost there, take a break if you like (you can save the SG for another day, assuming you car stays clean and dust free). You will have to wash if you cannot store it in a garage etc. Step 3 The Sealant Glaze The SG does not contain water, it's super concentrated and is meant to be applied by a dry applicator (either an microfiber applicator (remove label first) or a sponge (preferred). The first coats may seem a little "dry" but as you continue to use the same part of the sponge (the sponge or microfiber applicator will soak up some SG), so it will just glide on. Shake the bottle - apply a dime (or just put the applicator on top and turn it over) to your dry sponge applicator (or a dry microfiber applicator) and apply the SG in shorter strokes starting with the hood (and continuing on with the panel order). IMPORTANT: The amount of SG applied will look very thin. It will barely glide on, almost like you are applying it until it disappears (but try to move to a different spot and just let a little residue stay). Do not intend on it looking like a wax as it slightly hazes on your car. Remember your goal: 1 oz per coat following panel order. Apply as much as you would lip balm on your lips, ie sparingly (you should barely see it almost like a fine spider web but it should be wet while applying) Yes! we can't stress this enough. It's time for a break. Wait at least 20 minutes for the Klasse to dry and "cure" somewhat. Take a soft plush cloth (again preferably one of my microfiber cloths) and buff off the SG. Note: If it takes a lot of effort, you put on too much SG and need to put less on the next coat. If you really need to sprinkle your towel with some distilled water (tap is okay, but distilled is preferred) to aid in the SG removal. Also: Many have discovered that successive coats of SG are better applied over time then right away. At this point you may wish to wait until the following day (or week) to apply the second and final coat of SG. Please only do this, if you intend on keeping the car in a dust free garage environment overnight (you will need to rewash you car if you don't with a non-wax stripping wax) otherwise. (After have waiting 20 minutes), apply the second coat of SG, this should go on so easy by now because you will have mastered the art of applying this glaze ever so slightly, while achieving good coverage. Take a break and wait 20 minutes and buff off to a brilliant shine (use a little water if you absolutely have to). I have found that I can get more than 2 coats out of this bottle. With SG the more the merrier as far as coats go (not amount in a coat). Try to get 4 total coats out of the SG bottle you have applying it with at least 24 hours inbetween coats (apply it on another weekend, after washing and drying with a non-wax removing car shampoo and the results will be spectacular. Now just sit back relax and take the "after" pictures to show off to your friends referring them to my site to get their own Klasse, of course. Also remember that microfiber is the best way to keep you "Klassed" finish pristine. Wash you car almost weekly, dry it with a microfiber, and give it a final dry with some quickdetailer. www.yosteve.com also describes methods to better handle paint preparation and how to wash you car correctly. Visit Jason's Detailing corner. He's a trusted friend that helps me answer questions anyone might have, and he's written a complete section on how to keep you car looking nice. |
The Klasse Kit Directions listed are very comprehensive for the basic newbie - directions my vary, these are my own recommendations. If you're a veteran and would like to add to the mix, do so at the Klasse Application Forum. Happy Detailing!!!! Steve. |
New! Klasse Sample Kits Now you have one, how do you use it? |
Updated: June 22, 2002
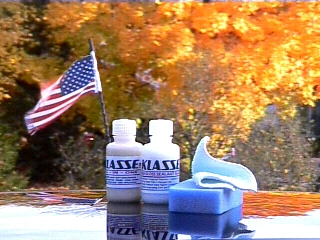
=Klasse= Sample Kit |
The Klasse Kit Directions listed are very comprehensive for the basic newbie - directions my vary, these are my own recommendations. If you're a veteran and would like to add to the mix, do so at the Klasse Application Forum. Happy Detailing!!!! Steve. |
The Application And while applying Klasse isn't rocket science, it does take some effort, time, and patience in order to achieve the best shine possible. On a unclean car I would give my self probably a good 3-5 hours. In reward, the shine (with regular washing will last up to 9 months or more. With Klasse, the ends do justify the means, so lets get started. The each kit contains both the AIO and the SG in 2 oz bottles. And while that may seem like a small amount, the typical Klasse application is about 1 coat per ounce. You will easily be able to get a 2+2 coating in with this kit providing for months of acrylic Klasse protection and shine. Someone who is used to the product may get double the coats you might, the first time. On my car, I got a coat of SG in about 1/2 an ounce (this is beacause of paint prep, the smoother your original finish, partly due to the AIO and other paint prep, the thinner you can spread the SG) You might want to take before pictures of your car before continuing. Step 1 - Prepare Your Car Thoroughly wash your car. Try to get off as much visible dirt contaminants as possible. As part of the paint preparation you may want to use products such as tar removers, clay bars, and swirl removers, etc. Your car should look as good (clean) as it can without wax on it before you start. For for further info check here too. Wash the wheels as well especially if you choose to Klasse your wheels (works great on painted wheels). Dry the car. (After step 1 your car should be "squeaky clean" and dry.) Step 2 Apply the AIO - Take your microfiber towel applicator and rip off the label (the towel is strong so don't be afraid to use some force)Go to the sink and rinse off the towel with water, wringing it a few times. Wring off the towel to get most of the water out. - Shake the bottle well and put a dime amount on the towel applicator (folded as to avoid rubbing the paint with the sewn edge or just concentrating strictly on the center of the cloth). You may just want to put the towel on the bottle opening and turn it over a few times. - Work the AIO into the paint with side by side slightly overlapping sweeps (usually In the direction of how air would flow if your car were being driven) Work 1 panel at a time using a fair to light amount of pressure and concentrating on problem areas like spots or tar. Here's my favorite panel order: hood, trunk, roof, front, upper side, back, upper other side, lower side, other lower side. Important: Remember this is not like a wax; it takes an extremely small amount of the stuff to get good results. You are not looking to get a thick haze or a waxy surface like you would from a product at the autostore. If the towel gets visibly dirty quickly, rinse and wring it in the sink again (you may want to rinse and wring the applicator after every panel. Work around the car doing the all the panels. Note: You have about 1 ounce for the whole car. As you get halfway though the car you should be only through ¼ of the bottle. Many of us use 1 or 2 oz bottles to help us gage the amount we are supposed to use, so don't feel you are skimping. - Clean your towel again and repeat around the whole car (this may use up the rest of the bottle) any extra amount will be used for windows or wheels if you like. (Rinsing the applicator again as you go and working on long slightly overlapping motions, etc) Concentrate on smoothing out the "rough" spots and visible contaminents (it might be a good idea to see if you are rubbing too hard as different clearcoats have different hardnesses. Also: After you are finished add a little water to your towel and clean all the windows (using the AIO residue on the towel or adding a little more). -Take a soft plush towel (preferably a microfiber from YoSteve.Com), and wipe off the residue left by the AIO. At this point the paint should be smooth as butter, without visible residue (if you really need to sprinkle some water on your towel before buffing in order to remove any slight haze) So okay that was a long step 2 but you're almost there, take a break if you like (you can save the SG for another day, assuming you car stays clean and dust free). You will have to wash if you cannot store it in a garage etc. Step 3 The Sealant Glaze The SG does not contain water, it's super concentrated and is meant to be applied by a dry applicator (either an microfiber applicator (remove label first) or a sponge (preferred). The first coats may seem a little "dry" but as you continue to use the same part of the sponge (the sponge or microfiber applicator will soak up some SG), so it will just glide on. Shake the bottle - apply a dime (or just put the applicator on top and turn it over) to your dry sponge applicator (or a dry microfiber applicator) and apply the SG in shorter strokes starting with the hood (and continuing on with the panel order). IMPORTANT: The amount of SG applied will look very thin. It will barely glide on, almost like you are applying it until it disappears (but try to move to a different spot and just let a little residue stay). Do not intend on it looking like a wax as it slightly hazes on your car. Remember your goal: 1 oz per coat following panel order. Apply as much as you would lip balm on your lips, ie sparingly (you should barely see it almost like a fine spider web but it should be wet while applying) Yes! we can't stress this enough. It's time for a break. Wait at least 20 minutes for the Klasse to dry and "cure" somewhat. Take a soft plush cloth (again preferably one of my microfiber cloths) and buff off the SG. Note: If it takes a lot of effort, you put on too much SG and need to put less on the next coat. If you really need to sprinkle your towel with some distilled water (tap is okay, but distilled is preferred) to aid in the SG removal. Also: Many have discovered that successive coats of SG are better applied over time then right away. At this point you may wish to wait until the following day (or week) to apply the second and final coat of SG. Please only do this, if you intend on keeping the car in a dust free garage environment overnight (you will need to rewash you car if you don't with a non-wax stripping wax) otherwise. (After have waiting 20 minutes), apply the second coat of SG, this should go on so easy by now because you will have mastered the art of applying this glaze ever so slightly, while achieving good coverage. Take a break and wait 20 minutes and buff off to a brilliant shine (use a little water if you absolutely have to). I have found that I can get more than 2 coats out of this bottle. With SG the more the merrier as far as coats go (not amount in a coat). Try to get 4 total coats out of the SG bottle you have applying it with at least 24 hours inbetween coats (apply it on another weekend, after washing and drying with a non-wax removing car shampoo and the results will be spectacular. Now just sit back relax and take the "after" pictures to show off to your friends referring them to my site to get their own Klasse, of course. Also remember that microfiber is the best way to keep you "Klassed" finish pristine. Wash you car almost weekly, dry it with a microfiber, and give it a final dry with some quickdetailer. www.yosteve.com also describes methods to better handle paint preparation and how to wash you car correctly. Visit Jason's Detailing corner. He's a trusted friend that helps me answer questions anyone might have, and he's written a complete section on how to keep you car looking nice. |